Hiya, happy Wednesday!! This is when my week ends and my weekend starts (well at 5pm tonight). Off we are to the Peak District for a wedding and a romantic long weekend away. Cannot wait! Today I thought I would do a very quick tutorial about vintage-looking pictures. This is something I have been trying to do for a while (although considering how easy it is, clearly I had not tried really hard in the past). And I think I have made good progress.
For those who are baffled by photoshop (me, me, me!), these tips do not require photoshop (phew!) - although check out the blogs that will tell you how to do with photoshop for people much more advanced than I am!
Two of the ways of achieving the look are free! The third one is not ... But not too expensive.
There are other ways to do it, I am sure, but I am probably not registered with the sites - there are so many sites a girl can manage.
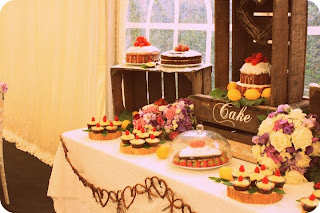
So here we are, my original picture is the one I took at the wedding last weekend.

It is alright but a bit boring.. let's shake things up a bit.
1. Using Phixr and The Cross Process effect

This is really simple. You log onto Phixr (free), you upload your picture (very easy), choose the color effects option in the menu on the left handside (sepia picture), and choose the cross-effect in the sub menu. Ta Da! You can adjust the contrast and the brightness as well as the opacity of the picture. In the example above I only used the cross-process effect.
2. Using Picnik and the 60s effect
 Log on to Picnik (through your Flickr account) (it is free for some effects), upload your picture, select 'edit', you will see the tab CREATE at the top. Choose EFFECTS, and then the 1960's option. They have an option to round corners of the pictures, you can choose. Ta Da'! You are back in the 60s!
 3. Using Picnik and Curves
 You know the drill, you upload, go to edit, and select CREATE, this time select ADVANCED. You want the CURVES option. This is the most advanced way to achieve because you can change the red, blue and green curves. You can also select the pre-set cross-process blue curve or red curve effect (see above for the pre-set blue option).

In Curves, Select CHANNEL. For both the red and green lines (which are done separately), you'll need to drag the line near the top up a little diagonally, so that it's hardly under the grey (the middle) line. Near the bottom of the line, do the opposite. What you're doing is adding red to the highlights and subtracting red from the shadows. (You're doing the same for the green.). Select the blue channel now and do the opposite of what you did to the red and green lines. Go near the top of the blue line and pull the line down diagonally, therefore subtracting blue from the highlights. Now go to the bottom of the line and pull the line up diagonally so that you're adding blue to the shadows. Play around a little bit to achieve the desired look.
 And.... The Polaroid Look

In CREATE in Picnik, select FRAMES and Polaroid (free). Ta Da! This picture could have been taken at my parents' wedding in the 60s! So guys, when are you give your pictures the vintage look? You know you want to...


 Guys, join the blog list, what would you be blogging today about otherwise?

